Science fiction cinema is one of the most attractive film genres. As these films become increasingly popular, some visual techniques used in science fiction films are introduced to the customer market, such as green screen. Considering some renowned movies like 300, The Day After Tomorrow, Avata, etc., they were all filmed in front of a green screen. Now, we can replicate this technique on our own. And to help you understand how this process works, we’ll show you how to make a green screen video at home. You don’t need professional movie making experience or professional movie makers, like Adobe Premiere. All you need is to follow our guides and tips below.
Table of Contents
Why do you use green screen?
Most people first learned about green screen is that the meteorologist uses a green screen to report the weather. They stand in front of the green screen background and select a specific region of the forecast. In reality, green screen does more than provide clarity. It’s a great option for adding a personal touch to many different types of videos.
Product videos, for example, use green screen to create an engaging atmosphere. And by making a green screen, you can walk in space without wearing a spacesuit or paying a dime.
Consider making a green screen the next time you need to record: screen video, animated elements, presentation slides, or portrait photos. When done right, green screen will give your video a professional look at an affordable cost. You don’t even need to build a fancy stage or rent a professional photography studio.
In short, making a green screen is the most cost-effective way to create professional aesthetic videos at home.
How much does it cost to get a green screen?
When making a green screen video, a green screen background kit is necessary. There are several ways to make a green screen background. For example, you can paint the wall green and create a permanent green screen. Or attach several pieces of green paper to make a background. Additionally, you can purchase a green screen kit online conveniently.
There are many online retailers selling green screen background kits and the prices are different.
On eBay, the price for the 6.8×5.2 ft green screen background kit is the lowest at $5.2 with free shipping. The best sale is a 10×10 foot non-glossy green screen backdrop, which costs $14.20.
At H&B, a 5x9ft Savage Wrinkle Resistant Green Screen Backdrop costs about $43.99. As the size increases, the price is higher. The best seller is the 10×130-foot Westcott 9 Wrinkle-Resistant Chroma-Key Backdrop.
In Adorama, there are also many green screen options. Smith-Victor Chameleon chroma-key 57×77 costs $59.95. Belle Drape Background 5×6.5′ Chroma Blue & Green is only $19.95. And there are valuable green screen bundle kits, such as the Westcott Green Screen Photo Illusion Lite Bundle.
Anyway, you can research the green screen background kit online and find out the best price as per your demands.
But it is obvious that making a green screen video is much more affordable compared to other film techniques.
How to make a homemade green screen
If you’re new to homemade green screen video, you may not know how to make a green screen video at home. Don’t worry! You can learn the knowledge in this part.
Make a green screen in iMovie
Step 1: Before making a green screen video at home using iMovie, you need to prepare several things. First, capture your subjects in front of the green screen background. Remember not to put any green color on the subjects, such as clothing. Download the background video clip you want online.
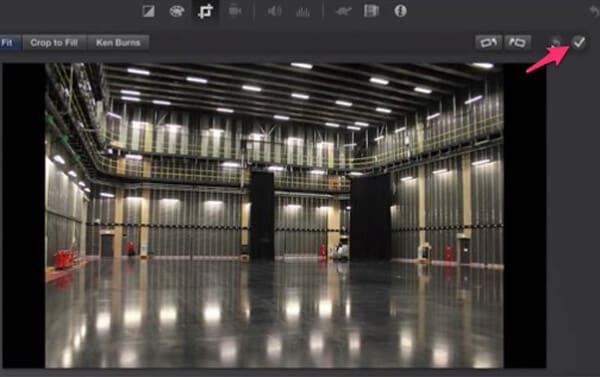
Step 2: Import both the background video and green screen video to a new project in iMovie. Place the background video on the timeline and edit it according to your requirements, such as cropping to highlight a part of the background.

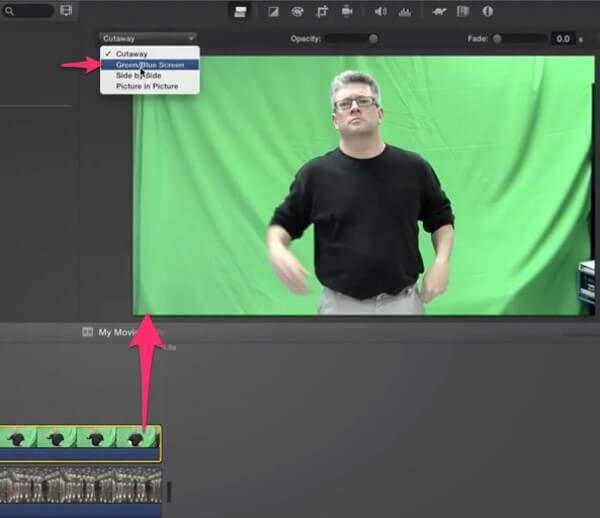
Step 3: To make a green screen video, place it on the timeline above the background clip. Make sure both videos are the same length. Select all the frames of the green screen video and locate the top ribbon, display the drop-down menu above the player and select “Green/Blue Screen”.
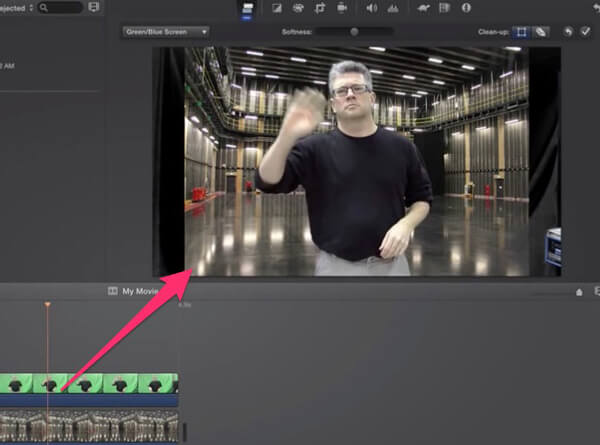
Step 4: After the green screen background becomes transparent, adjust the position, size and orientation of the subject until you are satisfied. Finally, export the resulting video to your hard drive.
Also Read: Tips and Tricks on Windows Live Movie Maker
Make a green screen with video editor
If you don’t have iMovie on your computer and want to find an easy-to-use green screen editor. Supports making a green screen video at home with one click on Windows 10/8/7/XP and Mac OS. Additionally, this video editor offers extensive custom options and video editing tools.
Step 1: Import the raw video files to green screen creator
Download and install the latest version of Video Editor on your PC. There is a dedicated version for Mac. Launch the green screen creator and import the green screen video and desired background to the media library.
Step 2: Make a Green Screen Video in One Click
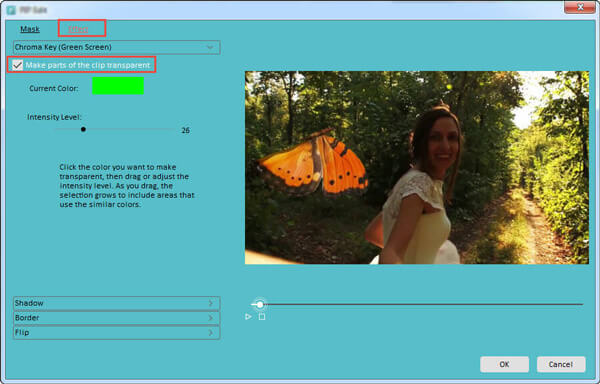
Place the two videos on the timeline and set them to the same duration. Right-click the green screen video and select “Green Screen” from the menu list. When the pop-up dialog box appears, go to the “Effect” tab, check the box for “Make parts of this video transparent” option and choose the color green from the current color palette. You can adjust the “Intensity Level” to change the transparency level of the background. Then click “OK” to confirm it.
Step 3: Export the resulting video
Return to the video editing window, drag the top layer video to the appropriate position and adjust the size. Preview the resulting video in the built-in player. If you’re happy with it, click “Export” to save it to your computer or share it on your social account.

Also Read: How to Make Faceless Videos
Conclusion
Do you want to make a professional movie on your own? Are you having trouble making an engaging YouTube video? Our guides and tips above can help you find the answer. Making a green screen is not only affordable for the average person, but it’s also very easy if you choose the right tools. We have told you how to make a green video at home in this tutorial. And we hope that it is helpful and useful to you.

